OpenCL fractal generation
May 27, 2014
I’ve been meaning to play around with OpenCL for a while (like a couple of years), so I decided to experiment with some of the basics. In this post I’m going to be focussing on using OpenCL on OS X to create some Mandelbrot fractals, so I’ll assume you’ve already read the first few chapters of Apple’s documentation (don’t worry, it doesn’t take long). If you want to skip the post and get straight to the code, please check it out on GitHub.
Start out by creating a new command line tool (Foundation) in Xcode, linking it with AppKit.framework, Foundation.framework and OpenCL.framework (you’re going to want to do this because we’ll need to write a tiny bit of Objective-C to save the images). Import these frameworks in main.m:
The next step is to actually write the kernel. OpenCL kernels are basically programs written in a C-like language that execute on the stream processors of the GPU, a little like OpenGL shaders (but way more powerful). The kernel is based off of this GLSL shader (so I won’t go into detail on complex numbers):
//mandelbrot.cl

const sampler_t sampler = CLK_NORMALIZED_COORDS_FALSE | CLK_FILTER_NEAREST;

kernel void mandelbrot(write_only image2d_t output, float width, float height, int iter) {
    size_t x = get_global_id(0);
    size_t y = get_global_id(1);

    float2 z, c;

    c.x = (float)width / (float)height * ((float)x / width - 0.5) * 2.2 - 0.7;
    c.y = ((float)y / height - 0.5) * 2.2 - 0.0;

    int i;
    z = c;
    for(i = 0; i < iter; i++) {
        float x = (z.x * z.x - z.y * z.y) + c.x;
        float y = (z.y * z.x + z.x * z.y) + c.y;

        if((x * x + y * y) > 4.0) break;
        z.x = x;
        z.y = y;
    }

    float p = (float)i / (float)iter;
    float so = sin(p * 3.141592653) * 255.0;
    float co = (1 - cos(p * 3.141592653)) * 255.0;

    write_imageui(output, (int2)(x,y), (uint4)((uint)co, co, (uint)(co + so), 255));
}
The kernel itself has several options, including the output image to write to, the width of the image, the height of the image (which are used to normalise the coordinates) and the number of iterations to do. This is fairly similar to the original GLSL shader, and it acts in a similar way because it is executed per pixel. Now we need the Objective-C/C code to run the kernel:
//At the top of the file
#import "mandelbrot.cl.h"

//Inside the @autoreleasepool in int main()

//1
dispatch_queue_t dq = gcl_create_dispatch_queue(CL_DEVICE_TYPE_GPU, NULL);
if (!dq) {
    fprintf(stdout, "Unable to create a GPU-based dispatch queue.\n");
    exit(1);
}

//Output size
size_t width = 1920, height = 1080;
//Number of iterations to do
int iter = 1000;

//2
//This actually comes out as an unsigned char *, however we can cast that to an unsigned int * to get four 8-bit channels
unsigned int * pixels = (unsigned int*)malloc(width * height * sizeof(unsigned int));

//3
cl_image_format format;
format.image_channel_order = CL_RGBA;
format.image_channel_data_type = CL_UNSIGNED_INT8;

//4
cl_mem output_image = gcl_create_image(&format, width, height, 1, NULL);

dispatch_sync(dq, ^{
    //5
    cl_ndrange range = {
        2,                  // 2 dimensions for image
        {0},                // Start at the beginning of the range
        {width, height},    // Execute width * height work items
        {0}                 // And let OpenCL decide how to divide
                            // the work items into work-groups.
    };

    // Copy the host-side, initial pixel data to the image memory object on
    // the OpenCL device.  Here, we copy the whole image, but you could use
    // the origin and region parameters to specify an offset and sub-region
    // of the image, if you'd like.
    const size_t origin[3] = { 0, 0, 0 };
    const size_t region[3] = { width, height, 1 };

    //6
    //Execute the kernel
    //mandelbrot_kernel is a GCD block declared in the autogenerated mandelbrot.cl.h file
    mandelbrot_kernel(&range, output_image, (cl_float)width, (cl_float)height, iter);

    //7
    // Copy back results into pointer
    gcl_copy_image_to_ptr(pixels, output_image, origin, region);
});

//8
//Finally, export to disk
NSBitmapImageRep * imageRep = [[NSBitmapImageRep alloc] initWithBitmapDataPlanes:(unsigned char **)&pixels
                                                                      pixelsWide:width
                                                                      pixelsHigh:height
                                                                   bitsPerSample:8
                                                                 samplesPerPixel:4
                                                                        hasAlpha:YES
                                                                        isPlanar:NO
                                                                  colorSpaceName:NSDeviceRGBColorSpace
                                                                    bitmapFormat:NSAlphaNonpremultipliedBitmapFormat
                                                                     bytesPerRow:4 * width
                                                                    bitsPerPixel:32];
NSData * outData = [imageRep representationUsingType:NSPNGFileType properties:nil];
[outData writeToFile:[NSHomeDirectory() stringByAppendingPathComponent:@"mandelbrot.png"] atomically:YES];


// Clean up device-size allocations.
// Note that we use the "standard" OpenCL API here.
clReleaseMemObject(output_image);

free(pixels);
This code does the following:
- Creates a dispatch queue for OpenCL. On OSX Apple has made it super easy to run OpenCL kernels by integrating them with GCD. On other platforms a lot more boiler-plate code is required
- Allocates some bytes for the image (notice that we allocate 4 bytes - 1 unsigned integer - per pixel for the RGBA channels)
- Creates a struct describing the image format (RGBA, 1 byte per component) for OpenCL
- Allocates OpenCL memory for the image
- On the OpenCL queue a range is created to describe the image (this should be familiar once you’ve read through Apple’s docs)
- Execute the kernel
- Copy the image data back to the main memory from OpenCL’s memory
- Create an NSBitmapImageRep for the data, encode that as a PNG and export to disk
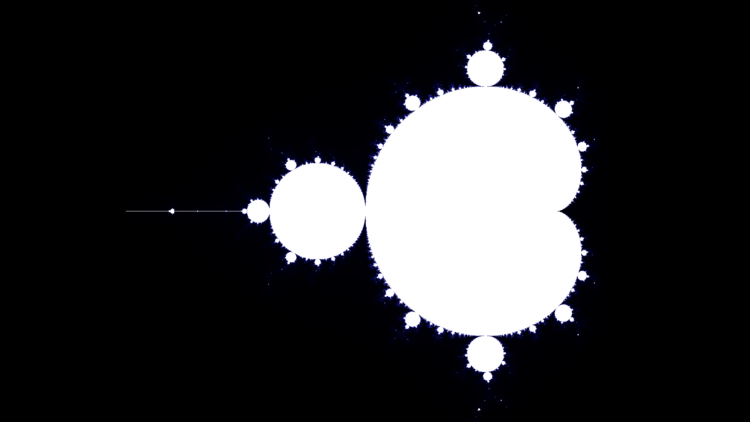
Voila! You’ll find this in your home directory:
As a bonus, I also stuck this in a loop and generated a video for the first 1000 iterations:
OpenCL is really powerful, and Apple has done an awesome job at integrating it into OSX and Xcode. This project doesn’t even begin to scratch the surface of what you can do with it. At some point soon I’m going to take a look at some more advanced topics such as image processing and integrating with OpenGL.