Aside from new features, I’m now also including ads again - photo backgrounds and text colours had previously been ‘pro’ features before I removed Keep Calm Pro from Google Play.
Play Time 2, my music statistics app for iOS, has just received a major update. You can now view how you listen to your music over time, view interactive graphs for your listening habits of individual songs, albums, and artists, and view more statistics than ever before. Play Time 2 is available for $0.99 from the App Store today.
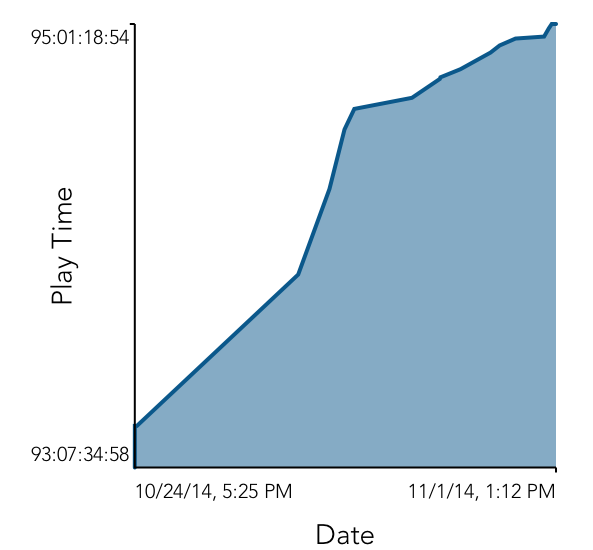
Play Time, Over Time
Play Time, Over Time
Each time you launch Play Time it records the total play count of every song in your music library. As these change you’ll be able to see how the total play time of any song, album, or artist, or your whole library, change over time. The graph itself is interactive and you can view the total play time at any point in time.
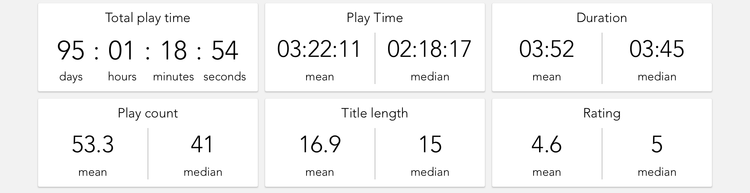
New statistics
New statistics
Previously you could only view a handful of statistics about your music library, however you can now view average play time, duration, play count, title length, and rating as well as word counts in song titles. Songs, albums, and artists also show fun facts related to their play time. For example, I’ve spent about the same amount of time listening to Daft Punk as the gestation period of a mouse.
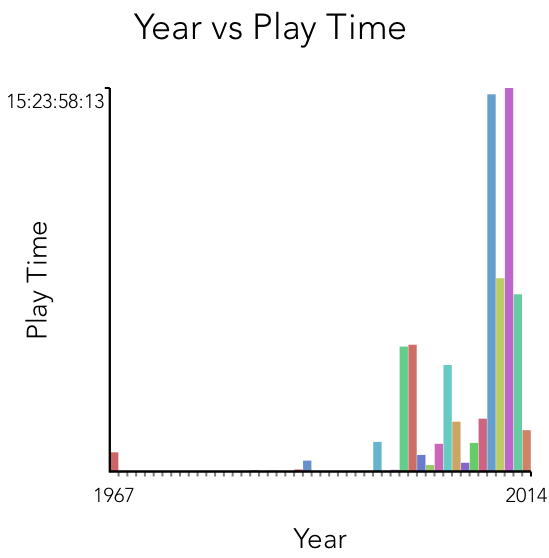
Interactive charts
Year vs Play Time
There are now interactive charts that allow you to view:
Rating vs play time (if you rate your music you’ll probably find that yours looks very similar to everyone elses!)
Year vs play time
Genre vs play time
Other new features
Support for new iPhones and the iPad with settings that sync via iCloud
Share any chart or statistic by tapping on it
CSV data export (works with Numbers/Excel/Google Drive on your iOS device or on your computer) in case you want to do even more analysis
Gravitational ratings (you’ll get it when you see it)
Yesterday I was finally shipping an update to one of my apps, but each time I tried submitting to iTunes Connect I got back error -9000:
Invalid architecture: Apps that include an app extension and a framework must support arm64
Googling didn’t reveal too much (the project was set up fine to build for both 32-bit and 64-bit), but the following seemed to fix the issue:
Going through project.pbxproj and manually replacing IPHONEOS_DEPLOYMENT_TARGET = 7.0; with IPHONEOS_DEPLOYMENT_TARGET = 8.0; (I had set 8.0 in the UI, no idea why the file hadn’t updated)
Ensuring that the ‘Build Active Architectures Only’ was set to NO for release builds (again, I had set this in the UI, but checked it in the project.pbxproj file)
Deleting an old static library from the Frameworks group. This is the weird one, but I suspect it was what was causing the issue. The app had previously linked to a static library that had been 32-bit only, but I had long since deleted it. The app itself didn’t link against it, but there was still a link showing up for it in the Xcode project (it showed in red though, it didn’t actually exist)
The phrasing of the error isn’t great; there ought to be an ‘or’ rather than an ‘and’ in there (my app only contains a framework, not an extension).
After two years of no updates I have now updated Word Finder with new features, significant performance enhancements, and support for new iPhones. Word Finder allows you win (cheat?!) many common word games with wild card search, anagram search, Boggle search, and Letterpress search.
A brand new query execution engine that ensures all queries now execute instantly (the old version could take several seconds)
Search history
Easy entry mode for Boggle and Letterpress grids and improved entry for anagrams
Sorting options
Save your favourite words
View definitions for thousands of words via Wiktionary or the built in Apple dictionary
The Nim programming language is simple, clean language with a style that will be familiar to Python programmers, but has the performance benefit of compiling down to C. The C the compiler generates is different depending on whether you have 32-bit or 64-bit code, which makes compiling for iOS (which has to target both 32-bit and 64-bit) awkward.
In this blog post I’ll summarise how you can use Nim for components of your app. I’ve got a working version of this project available on GitHub.
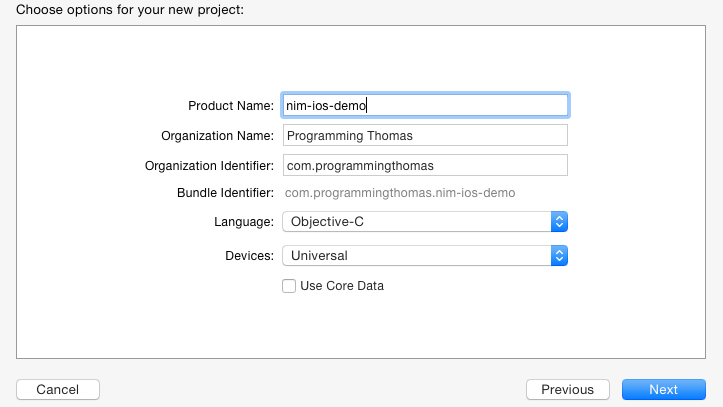
Firstly, if you haven’t already, grab the compiler and compile it (don’t worry, this is easy). Then create a new Objective-C project in Xcode. I’ve called mine nim-ios-demo:
Creating a new project
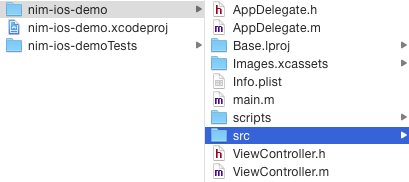
Next you’ll want to create two directories: scripts and src. Your folder structure should look like this:
Creating script folders
The src folder is where you’ll be placing your Nim source files. In scripts you need to place my xcode_prebuild.sh script (I modified it from work by Grzegorz Hankiewicz). This script compiles the Nim source files to C and creates the merged 32-bit/64-bit files. You need to add this script as a build phase in Xcode:
Script build phase
There are two minor changes that you’ll need to make to the script to use it in your project:
Set the PROJECT_DIR variable
Set the PATH_TO_NIM variable
Add your Nim source files in the ‘src’ directory. In this example I’m going to use a very simple function:
# Saved as backend.nim in the src directory
proc hello*(name: cstring): cstring {.exportc.} =
    result = "Hello " & $name
You can optionally add this to your Xcode project, but make sure that you don’t have Xcode set to copy or compile it! Note that we need the asterisk after the function name so that it gets exported, and {.exportc.} ensures that the name doesn’t get mangled. We also have to use cstring rather than string (Nim’s native string type) but they get bridged automatically at no cost.
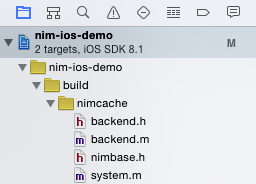
Build your project. This will run the Nim compiler and generate the C files you need to include in Xcode. Go ahead and add the contents of src/build/nimcache to your project:
Adding to the project
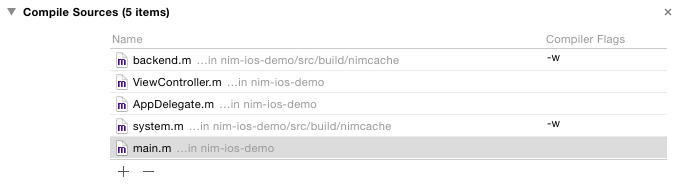
If you build now you’ll get a lot of warnings (50+). If you want to avoid these, add the -w flag to the files in their compile stage:
Compiling
Before you can use the Nim function you’ll need to configure the Garbage Collector. Add the call to NimMain in main.m:
By using [NSString stringWithUTF8String:] we can copy the contents of the string, which ensures that when Nim cleans up the memory later (helloName) we don’t lose the string.
Finally, you can build and run the app:
Once you’re up and running it is trivial to add new Nim code to your project. So far I’ve been very impressed with the language, and I may even use it in the future in my apps.
When Apple announced Swift last summer I was excited to learn a new programming language. After having programmed almost exclusively in Objective-C (with a bit of Go, JavaScript, C#, Java, and C++ on the side) for two years I thoroughly enjoyed picking up Swift’s new concepts such as functional programming, generics, and values.
Having enjoyed my experiences with Swift, I decided to play with a new programming language each month, so since July 2014 I’ve had a Programming Language of the Month:
The amount of work I’ve done in each language has varied hugely. I only did a small amount of work in Prolog to familiarise myself with the basic concepts, but I’ve written semi-large programs in all of the others.
Learning, or at least experimenting with, a new language is a tremendous adventure for any programmer. Its been a valuable experience picking up ideas in a variety of functional, imperative and declarative programming languages. If you’ve got the time, I’d give a PLoTM a try.
Swift has encouraged many developers to consider Cocoa and Cocoa Touch development, but the vast majority of resources are still written in Objective-C. I’ve done a huge summary over on GitHub of many common patterns.
It may be tempting to rewrite existing classes in Swift, however this will generally be a waste of engineering resources. A better approach is to add functionality to existing Objective-C classes by writing categories for them in Swift. This way, if you choose, you can write all future code in Swift whilst avoiding unnecessary extra work.
Cake Day, my iOS app that reminds you once a year of your reddit cake day (birthday), has been updated with a new UI and iPad support.
Changes:
Completely removed the hamburger menu. Apple discourages these and it didn’t work brilliantly, so I decided it would be best if it went
Changed the app’s default font (now using Open Sans)
Rewrite of the app in Swift. I hadn’t originally planned to do this as part of the update, but I wanted to see whether or not Swift could improve my programmer productivity. Overall I found that the amount of code that I had to write was similar - although I now have a lot more database could for dealing with SQlite.swift than I had before when using FMDB
The app is now open source you can contribute or post issues at GitHub
You can download Cake Day for free from the App Store.