I’ve published an update to Keep Calm for iOS just in time for Christmas. This version adds PDF export for Pro users, which is great if you want to print your posters from your computer later. PDFs can be either opened in another app (Kindle, iBooks, Dropbox, etc) or shared directly (email, iMessage).
You can download Keep Calm for free from the App Store. The Pro upgrade costs $0.99.
It is a little bit of a pain to use OpenGL with Swift as GLKit is barely compatible. This is because GLKit’s math functions and types are all based off of unions, which Swift doesn’t support because they are designed to be unsafe. You are left with two choices: roll your own matrix library in Swift (which may miss out on the ARM NEON or Intel SSE performance enhancements) or hide GLKit behind some Objective-C.
I decided to go for the latter, and the product is OpenGL.swift. Instead of using unions I have used structs which contain one member:
typedefstruct { GLfloat m[16];} TDMatrix4;
I then wrapped all of GLKit’s math functions and I internally cast my matrix and vector types to the GLKit types in Objective-C code. As all of my functions and all of the GLKit functions get inlined there is no performance cost to this. My code was all generated by a Ruby script directly from the GLKit headers.
Once I had wrapped all of the GLKit math functions and types I then wrapped all of the uses of matrices and vectors in GLKit classes, so you can actually use them from Swift:
let aspect = GLfloat(CGRectGetWidth(self.view.bounds) / CGRectGetHeight(self.view.bounds))
let projectionMatrix = TDMatrix4MakePerspective(GLKMathDegreesToRadians(65.0), aspect, 0.1, 100.0)
self.effect?.transform.td_projectionMatrix = projectionMatrix
At this point I then added operator overloading using all of the standard methods, so in Swift you can concisely do matrix math:
let mvpMatrix = projectionMatrix * modelViewMatrix
As well as this I also added wrappers around the standard uniform functions so it is much simpler to submit matrix and vertex data to the GPU:
//Submitting vertex data
glBufferData(GLenum(GL_ARRAY_BUFFER), vertexData, GLenum(GL_STATIC_DRAW))
//Setting uniform data
glUniformMatrix4fx(mvpMatrixSlot, TDFalse, mvpMatrix)
You can get the source for OpenGL.swift on GitHub (there are instructions for dropping it into your project there as well).
If you create a new Objective-C GLKit project in Xcode 6 and rename your main view controller to a .mm (Objective-C++) file you’ll immediately get linker errors with some of the common GLKit classes not being found. This is because in Xcode 6 you don’t have to explicitly link against Apple frameworks. To fix the linker errors, just add GLKit.framework to your Linked Frameworks and Libraries.
A couple of days ago I released Keep Calm 4 for iOS, just over two years after the release of the first version. The new update brings several bug fixes as well as a few new niceties. Despite the bump in the version number this has probably been one of the smallest updates I’ve done to the app since its release. In this post I’m going to give a technical overview of some of the work I’ve done on the app.
View controller transitions
In iOS 7 Apple introduced View Controller transitions (see objc.io for a really good tutorial). These give you full control over how one view controller transitions to another. In the above video you can see that I am pushing from a UICollectionViewController to a custom view controller (alternatively I could have used a Collection View layout transition, but this would have been a bit inefficient for my use case). Towards the end of the video I swipe in from the left of the screen (i.e. the standard back gesture) and you can see that the poster interactively shrinks back into its original position. In order to achieve the effect I do the following:
Set the navigationController delegate to the UICollectionViewController
All of the collection view cells undergo an animation that shrinks them (sets their transform to a scale of 0.75) and fades them out
The new view controller is immediately added to the view, along with the main poster view
The poster view is positioned in the same place as the cell that was tapped
The poster view then undergoes an animation that causes it to fill the screen
In reverse a similar series of events happens, except that it also supports interaction (so you can effectively watch the animation in slow motion). I’ve also used some of the spring based animations in iOS 7 to give it a little bouncing effect. The following values produce a fairly subtle bounce:
It wasn’t particularly trivial to implement the interactive transition, and it was made harder by the fact that I’m using Auto Layout pretty much everywhere in Keep Calm now. Auto Layout animations also work slightly differently to regular animations as well, because you don’t set the final state of the animation inside the animation block:
//Configure constraints for 'final' animation state[UIView animateWithDuration:duration animations^{//'Apply' the updated constraints [self.view layoutIfNeeded];}];
Vector crowns
Keep Calm contains 1000 custom crowns that you can replace the crown at the top of the poster with (as well as the option for images and emoji). In previous versions these have always been @2x PNG files and they took up about 70% of the app’s bundle size. This has been fine up until now, but with the @3x iPhone 6+ I really needed to improve the quality.
Now Keep Calm ships mostly with PNGs still but many of the more common crowns have been replaced with vector paths instead. These vectors have been produced by:
Taking the original SVG file and simplifying it down to one path using Sketch
Converting strokes to filled paths
Exporting each crown as an SVG file
Running a custom C program on each SVG file to produce binary encoded path data, which is then stored in an SQLite database
Keep Calm loads the binary path data from SQLite and decodes it using a custom UIBezierPath extension
Paths are rendered in a custom view using the appropriate colour
Core Image colorisation
As well as being able to change the crown in Keep Calm, you can also change the colour of it. In older versions of the app the white crown PNGs were filtered using a CIColorMatrix filter. Unfortunately, despite having the math right, the produced colour was always slightly different from the text. It was usually fine for grey scale colours, but anything else would be off by ±5%. I’m still yet to establish why this occurred, but there was an easy work around.
I now create a plain CIImage which represents a single colour. Then I apply a mask to that image using the alpha channel of the crown image. The result is a correctly coloured crown image.
This bug has been in Keep Calm for nearly two years, so I’m delighted to finally fix it once and for all.
Supporting iOS 7 and 8
Keep Calm 4.x will continue to support iOS 7 into the foreseeable future. I’m not depending on any iOS 8 features like extensions, so it makes sense to support iOS 7 still. Furthermore, given that iOS 8 adoption is slower than iOS 7 it will be a while until the majority of my customers are on iOS 8. A key factor I have to consider is that the vast majority of Keep Calm users tend to be children, so devices like the iPod touch and 16GB iPhones make up the majority of my users. These devices may not have been updated to iOS 8 in fears that it will slow them down or that it requires too much free storage space.
Swift
This update doesn’t contain any Swift because it was primarily written against the iOS 7 SDK in about July (I was slow releasing it because of the extra work of vectorizing crowns). I’m pretty sure that I will begin to use Swift more over the next few months, but for now I’m restricting it to where I’m creating new classes.
Future
Keep Calm on iOS remains a priority for me over the Android version. Over the next few months I’ll be adding more vector crowns and bug fixes. The next update (probably 4.1) will likely be a ‘Snow Leopard’ style release where changes are primarily just fixes and minor improvements rather than major new features.
About half of all of the code in Keep Calm is in my private shared framework that I use across my apps. I’ve finally begun cleaning it all up and putting it in separate modules, so it is actually reasonably likely that it will be fully open sourced in the next few months :).
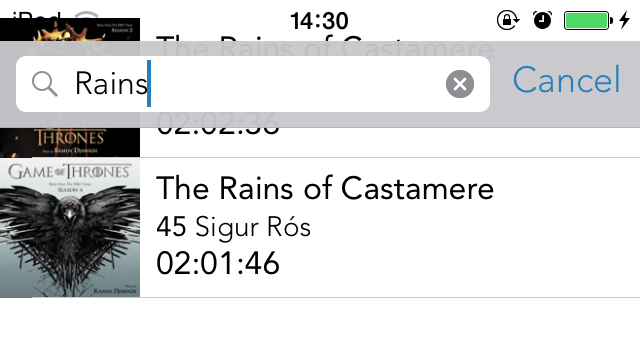
UISearchDisplayController has been the standard way to provide searching on a table view controller for the last five years, however it has always been a little broken and hard to use, so when it was replaced with UISearchController in iOS 8 I was relieved. You can find excellent examples of its usage here (Swift) and here (Objective-C).
Sadly, it turns out that UISearchController has its own issues as well, with the search bar sometimes covering the navigation bar, or content being visible under the status bar:
UISearchController problem
Thankfully, you can use This One Weird Trick to resolve these issues by setting the following in your main view controller (generally the table view controller that contains the search bar):
self.definesPresentationContext = YES;
So what’s going on here? The definesPresentationContext property is new in iOS 8, and the documentation states the following (emphasis mine):
When a view controller is presented, iOS starts with the presenting view controller and asks it if it wants to provide the presentation context. If the presenting view controller does not provide a context, then iOS asks the presenting view controller’s parent view controller. iOS searches up through the view controller hierarchy until a view controller provides a presentation context. If no view controller offers to provide a context, the window’s root view controller provides the presentation context.
If a view controller returns YES, then it provides a presentation context. The portion of the window covered by the view controller’s view determines the size of the presented view controller’s view. The default value for this property is NO.
The primary issue here is that when the search controller is presented it is presented modally it is going up the view controller hierarchy and checking with each view controller - generally a UITableViewController and then a UINavigationController - whether they can present the view controller. As definesPresentationContext is NO by default, the search controller is displayed modally across the whole screen (hence the issues with the status bar and navigation bar). By setting definesPresentationContext to YES you ensure that the search controller is presented within the bounds of the original table view controller.
Today I published Keep Calm 3 for Android. This update contains lots of minor changes and improvements since the last version:
New icon
Like on iOS, you can begin a line with a lowercase letter so that it appears smaller (like the ‘and’ in the original poster)
Improved poster appearance and responsiveness
Removed ads
Slightly modified UI
Android 4+ only
As well as these minor changes, this update is also the first time that I’ve unified the code base for Keep Calm and Keep Calm Pro. However, I will not be shipping further updates for Keep Calm Pro as a separate app as Keep Calm 3 will allow users to upgrade via an in-app purchase (this will be available within the next week).
Keep Calm is a fairly small app, clocing in at around 5000 lines of code. For my most recent update I decided to focus not on new features, but improving the user experience in simple but effective ways. I also removed a lot of code for iOS 6 (I had been using FlatUIKit on iOS 6, but not on iOS 7 - I’m no longer using any external dependencies). This post details the wide variety of changes that I made and some of the technical challenges that arose.
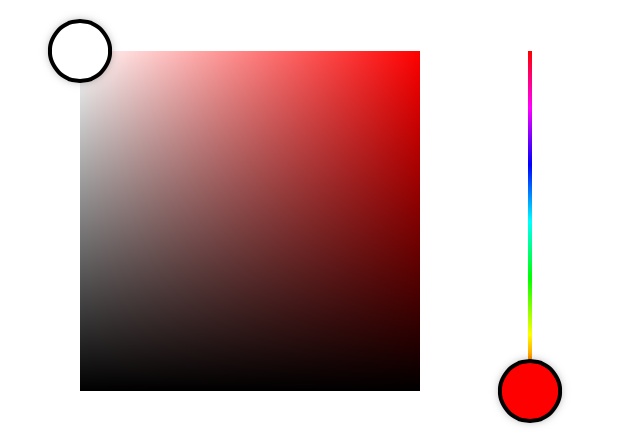
Color picker
The old version of Keep Calm had a bit of a rubbish colour picker that was essentially just three UISliders. The new colour picker is a dramatic change, and relies heavily on Core Animation and OpenGL ES. This is the first time I’ve shipped an app that uses OpenGL, although I’ve been playing with it since December 2012.
The structure of the control is really simple. There is an GLKView that draws the main saturation-brightness square. I had tried doing this using Quartz 2D, however this proved to be far too slow and after shifting around the calculations I was able to draw the square using GLSL in far less than a millisecond (the video is a little laggy, but the view runs at 60fps on a real device). Wikipedia has all of the formulas that you need to convert HSB to to RGB, however most implementations use branching (depending on which multiple of 60 the hue is between) however because branching should be avoided in shaders I therefore compile 6 separate programs that are generated at runtime. I had anticipated that this would be slow, however I’ve had now startup issues with the view.
The hue slider is made up of a static 1px wide image. This is created on the CPU using the formula described above (a simplified version of it, at least).
Finally, the two ‘loupes’ which appear on the hue slider and the saturation-brightness square are CAShapeLayers with a bunch of custom animations for when the user touches up and down. This is a really nice effect and works incredibly well on the device. It also makes it a hell of a lot easier to see the colour that you are picking out.
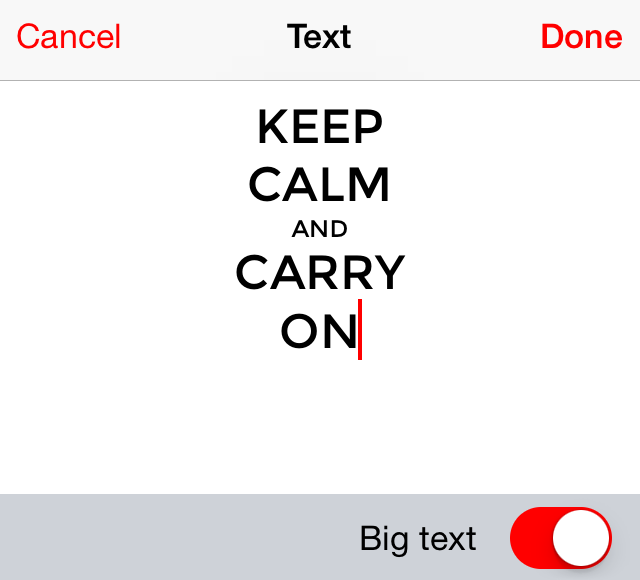
The new text editor is WYSIWYG, whereas the old one required you to begin ‘small’ lines with a lowercase letter:
Text editor
This was really easy to write using TextKit and UITextView, however it wouldn’t have been possible using iOS 6 (hence why I dropped support for it). The only issue I ran into was the UITextView scrolling bug, however I managed to use this solution to fix it.
Slick UICollectionView
UICollectionView is an awesome class, and I’ve been using it since iOS 6 came out for my main grid of posters. Each cell contains a UIImageView of a thumbnail for each poster. I do this, rather than drawing each poster or using the poster view I use in my editor, because it has proven to be the least memory intensive and the fastest solution so far. The process for displaying images is fairly simple:
The data source method is called to fetch the cell
If the thumbnail for the poster is in a cache, then load it immediately
Otherwise load it asynchronously and load it in a callback
However this still didn’t produce really smooth scrolling, especially on an iPad 3 or iPhone 4. These devices had a fairly similar CPU to their predecessors (iPhone 3GS, iPad 2), but four times the number of pixels (their GPUs are much better though) which means that loading images on them tends to perform a lot worse than their immediate successors (iPhone 4S, iPad 4). My new solution is to asynchronously load the thumbnails for cells a few rows ahead (or behind, if scrolling up) the current cell. This doesn’t produce a noticeable performance drop and ensures that posters are usually immediately visible when scrolling.
A framework for my apps
Since last October (with the release of Hipster Lab) I’ve been building a utility framework for use in my apps that simplifies a lot of common tasks. Keep Calm uses the latest version of this framework however most of the development on it this year has occurred as the result of a major update for Play Time that I’ve been working on. This framework will be available at some point on GitHub, but there is a lot I need to fix first.
Accessibility
I’d always held off putting accessibility support (for visually impaired users) into Keep Calm because I’d always thought it was far too visual an app, however I decided that it might be at least a worthwhile learning experience for me. I found that it was incredibly easy to add support and I encourage other developers to consider adding support into their app.
Keep it simple, stupid
Keep it simple, stupid
A lot of Keep Calm relied on custom drawing code in order to render the poster. The main poster view was constructed of two custom CALayers with several hundred lines of Quartz code. Now I’ve just gone for three UIViews; one for the background (this can either contain nothing, a gradient layer or a UIImageView depending on background content), one for the crown (UIImageView) and one for the text (custom UILabel). The benefit of this over my previous approach is that it is now much faster - rotations are a lot more slick, for example.
The greatest lesson I’ve learnt from this version of Keep Calm is, by far, to just go with the simplest solution because this is often the one that works the best.
What’s next?
This fall I plan to release v4 of Keep Calm, as well as an update to the Android version. The next version will be iOS 8 only (I will probably do a bug fix 3.x version that supports iOS 7 and 8) which will include minor user interface changes and maybe an extension so that you can create posters from pictures directly within the Photos app. Keep Calm will continue to be developed in Objective-C for the foreseeable future (some of my apps will be getting a little Swift treatment thought) but I’m strongly considering Xamarin on the Android side.
The new version of Keep Calm contains an awesome color picker shown in the video above. This is GPU accelerated with OpenGL, accessible and now open source on GitHub. I had hoped to use an existing open source project, however most pickers that I could find either had to use an external image, were limited to only a subset of all 24-bit colors or generated a lot of their graphics on the CPU.
Therefore my goal was to make my rendering code incredibly efficient, and as a result it can be animated at 60fps comfortably (it barely takes a millisecond to render the whole color square, whereas other color pickers take several seconds to generate pixelated versions on the CPU).
After nearly two years on the App Store, I’ve just released Keep Calm 3.3. This release isn’t focused on adding any new features, but is now much faster and easier to use. Previously if you wanted to create posters with lines of text of varying heights you had to type ‘KEEP CALM and CARRY ON’, however now there is just a simple switch in the UI. Furthermore, I’ve now got a new OpenGL ES accelerated color picker which I’m really happy with:
COBColorControl
As well as a new text editor and color picker the app has had a lot of performance improvements, and will also consume a lot less space on your device. Furthermore, I’ve also implemented accessibility so that visually impaired users can now use the app more easily.